Unified Access Gateway for end-user computing products and services needs high availability for Workspace ONE and VMware Horizon on-prem deployments. Unified Access Gateway appliances work with standard third-party load balancing solutions that are configured for HTTPS and also has an out-of-the-box High Availability solution. The out-of-the-box HA solution will reduce complexity and lower your TCO but it comes with the following limitations.
- IPv4 is supported for floating Virtual IP address. IPv6 is not supported.
- Only TCP high availability is supported.
- UDP high availability is not supported.
- With the VMware Horizon use case, only XML API traffic to Horizon Connection Server uses high availability. High availability is not used to distribute load for the protocol (display) traffic such as Blast, PCoIP, RDP. Therefore, the individual IP addresses of Unified Access Gateway nodes must also be accessible to VMware Horizon clients in addition to the Virtual IP address.
To overcome some of the limitations you can use NSX-T Data Center logical load balancer as a load balancing solution in front of the UAG’s.
In this blog post, I would like to show you how to configure a load balancer for UAG’s in NSX-T in front of a Horizon environment.
Monitors
A monitor probes the load-balanced server via its service. As long as the load-balanced server responds to the probes, the monitor marks it UP. If the load-balanced server fails to respond to the designated number of probes within the designated time period, the monitor marks it DOWN.
As it is recommended to monitor all service ports of Horizon TCP/UDP 443 TCP/UDP 8443 and TCP/UDP 4172 we will only show you how to create a TCP 443 monitor.
Login to the NSX-T Management console, go to networking, select Load Balancing, and then choose Monitors.
Click Add Active monitor, and select HTTPS.

Enter a Name, the monitoring port (443), and if needed change the monitoring interval (VMware Best Practise is 30 seconds) and the timeout period 15 (Seconds).

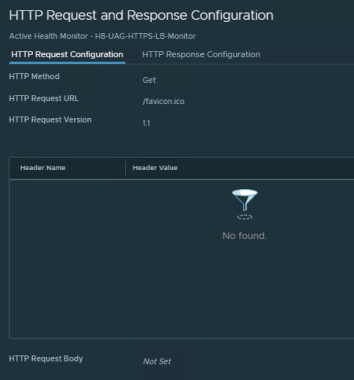
Click on the configure link behind HTTP Request select Get as HTTP Methode. HTTP Request URL is /favicon.ico and HTTP Request Version should be set to 1.1.

Select HTTP Response Configuration to add the HTTP response code 200. The Response code 200 tells the load balancer that the Connection server is responsive to brokering requests.

Click Apply and Save to finalize the monitor creation.
Profiles
We are going the use the predefined profiles so we will skip this part.
Server Pools
A server pool consists of one or more servers that are configured and running the same application. A single pool can be associated with both Layer 4 and Layer 7 virtual servers. We will add the UAG’s to a server pool.
Click Add Server Pool, give the pool a name, select algorithm in this case we used Least Connection.

Click Select Members. Click Add Member and provide all the details of the UAG’s.

Click Set behind Active Monitor and add the earlier created monitor. Click save to finalize the Server Pool.

Load Balancers
Now we need to create the Load Balancer. The Load Balancer will be attached to the Tier-1 Gateway. Click Add Load Balancer. Set the Name and underneath the attachment select the Tier-1 Gateway. The rest will be kept default.

Virtual Servers
Virtual servers receive all the client connections and distribute them among the servers. A virtual server has an IP address, a port, and a protocol. For Layer 4 virtual servers, lists of ports ranges can be specified instead of a single TCP or UDP port to support complex protocols with dynamic ports.
Click Add Virtual Server and click L4 TCP.
Provide a Name, enter the Load Balancer IP, the port(s). Select the created Load Balancer and the created Server Pool. For Persistence choose Source IP and choose the default-source-ip-lb-persistence-profile.

Conclusion
NSX-T provides you with a web-based user interface where you can manage your whole network environment including firewalling and Load Balancing.
Creating the Load Balancer was quite easy and straightforward to set up. If there are any questions please leave a comment.
One Comment
Leave a comment

Can you please explain how to load balance a setup with two Horizon Connection servers also?